服务端web框架
直接处理http请求和响应
将请求路由到相关的handler中
使从请求中获得数据变得简单
抽象数据库接口
类型提示
first_name: str, last_name: str
Dict[str, float]//第一个是所有键类型,第二个是所有值类型
Pydantic模型
- 三种序列化
dict,jsonable,JSON字符串
符合json schema
Meeting.model_json_schema()
数据校验
将数据的结构声明为具有属性的类
from pydantic import BaseModel
class User(BaseModel):
    id:int
    name:str="John"
    signup_ts: datetime | None = None
external_data={
    "id":"123",
    "signup_ts":"2017-06-01",
}
user = User(external_data)
并发async/await
常见的异步任务(i/o密集型)
- 通过网络发送来自客户端的数据
- 客户端接收来自网络中的数据
- 磁盘中要由系统读取并提供给程序的文件的内容
- 程序提供给系统的要写入磁盘的内容
- 一个 API 的远程调用
- 一个数据库操作,直到完成
- 一个数据库查询,直到返回结果
- 等等.
CPU密集型
- 音频或图像处理;
- 计算机视觉: 一幅图像由数百万像素组成,每个像素有3种颜色值,处理通常需要同时对这些像素进行计算;
- 机器学习: 它通常需要大量的"矩阵"和"向量"乘法。想象一个包含数字的巨大电子表格,并同时将所有数字相乘;
- 深度学习: 这是机器学习的一个子领域,同样适用。只是没有一个数字的电子表格可以相乘,而是一个庞大的数字集合,在很多情况下,你需要使用一个特殊的处理器来构建和使用这些模型。
示例
@app.get('/burgers')
async def read_burgers():
    burgers = await get_burgers(2)
    return burgers
async 和 await 的异步代码的所有功能大多数被概括为"协程"
- 导入
FastAPI。 - 创建一个
app实例。 - 编写一个路径操作装饰器,如
@app.get("/")。 - 定义一个路径操作函数,如
def root(): ...。
from fastapi import FastAPI
app=FastAPI()
@app.get("/")
async def root():
return {"message":"hello,fastapi"}
使用pydantic模型的查询参数
from typing import Annotated, Literal

from fastapi import FastAPI, Query
from pydantic import BaseModel, Field

app = FastAPI()


class FilterParams(BaseModel):
    limit: int = Field(100, gt=0, le=100)
    offset: int = Field(0, ge=0)
    order_by: Literal["created_at", "updated_at"] = "created_at"
    tags: list[str] = []


@app.get("/items/")
async def read_items(filter_query: Annotated[FilterParams, Query()]):
    return filter_query
Annotated[..., Body()] 的作用是显式声明这个…参数必须从请求体中获取
Annotated: 从 typing 模块导入,它是一种高级类型提示,允许我们为类型附加额外的元数据。
如果参数没有出现在路径中,fastapi将它识别成query,比如
from fastapi import FastAPI

app = FastAPI()

# 模拟一个商品列表
fake_items_db = [{"item_name": "Apple"}, {"item_name": "Banana"}, {"item_name": "Cherry"}]

# skip 和 limit 就是查询参数
@app.get("/items/")
async def read_items(skip: int = 0, limit: int = 10):
    # skip 和 limit 有默认值,所以它们是可选的
    return fake_items_db[skip : skip + limit]
cookie参数模型
from fastapi import Cookie,FastAPI
from pydantic import BaseModel
app=FastAPI()
class Cookies(BaseModel):
    model_config={"extra":"forbid"}//禁止额外的cookie
    session_id:str
    fatebook_tracker:str|None=None
    googall_tracker:str|None=None
@app.get("/items/")
async def read_items(cookies:Annotated[Cookies,Cookie()]):
return cookies
从提供的cookie中提取字段,传给Cookies这个base model模型
header参数模型
from typing import Annotated

from fastapi import FastAPI, Header
from pydantic import BaseModel

app = FastAPI()


class CommonHeaders(BaseModel):
    host: str
    save_data: bool
    if_modified_since: str | None = None
    traceparent: str | None = None
    x_tag: list[str] = []


@app.get("/items/")
async def read_items(headers: Annotated[CommonHeaders, Header()]):
    return headers
响应模型
一个有明文密码的输入模型和一个没有明文密码的输出模型
from typing import Any

from fastapi import FastAPI
from pydantic import BaseModel, EmailStr

app = FastAPI()


class UserIn(BaseModel):
    username: str
    password: str
    email: EmailStr
    full_name: str | None = None


class UserOut(BaseModel):
    username: str
    //注意这里没有password
    email: EmailStr
    full_name: str | None = None


@app.post("/user/", response_model=UserOut)
async def create_user(user: UserIn) -> Any:
    return user
不会包含默认值
@app.get("/items/{item_id}", response_model=Item, response_model_exclude_unset=True)
async def read_item(item_id: str):
    return items[item_id]
后端的Pydantic模型
class FormData(BaseModel):
    username:str
    password:str
@app.post("/login/")
async def login(data:Annotated[FormData,Form()])://如果发现是FormData数据类型,会提取使用后面的元数据
    return data
请求文件
@app.post("/files/")
async def create_file(file:bytes=File()):
    return {"file_size":len(file)}
@app.post("/uploadfile/")
async def create_upload_file(file: UploadFile):
    return {"filename": file.filename}
读取文件内容
contents=await myfile.read()
多文件上传
async def create_files(files: list[bytes] = File()):
async def create_upload_files(files: list[UploadFile]):
路径操作配置
支持summary和description两个参数
@app.post("/iems/",response_model=Item,summary="Create an Item",description="create an item")
deprecated参数可以把路径操作标记为弃用,无需直接删除
@app.get("/elements/",tags=["items"],deprecated=True)
JSON兼容编码器
@app.put("/itmes/{id})

def update_item(id:str,itme:Item):
   Json_compatible_item_data=jsonable_encoder(item)

   Fake_db[id]=json_compatible_item_data
将pydantic模型转换为dic,并将datetime转换为str
类作为依赖项
commons: CommonQueryParams = Depends(CommonQueryParams)
简洁写法
async def read_items(commons: CommonQueryParams = Depends()):
路径操作解释器作为依赖项(全局)
app = FastAPI(dependencies=[Depends(verify_token), Depends(verify_key)])
使用yield的依赖项
数据库依赖
async def get_db():
    db=DBSession()
    try:
        yield db
    finally:
        db.close()
yield和return区别:yield会暂停一个函数的执行,并产出一个值,函数会记住暂停的位置,下次取值时,它会从上次暂停的地方继续执行,return会彻底终止一个函数的执行并返回一个值
在包含yield和except的依赖项中一定要raise
def get_username():
    try:
        yield "Rick"
    except InternalError:
        print("We don't swallow the internal error here, we raise again 😎")
        raise
上下文管理器
with语句中使用的任何python对象
with open("./somefile.txt") as f:
    contents = f.read()
    print(contents)
openapi的安全方案
- apikey,查询参数,请求头,cookie
- http,标准的http身份认证
- oauth2
- openid connect提供了一种定义如何自动发现oauth2身份认证数据的方法
fastapi如何处理api与身份验证?
- 用户在前端输入
username与password,并点击回车 - (用户浏览器中运行的)前端把
username与password发送至 API 中指定的 URL(使用tokenUrl="token"声明) - API 检查
username与password,并用令牌(Token) 响应(暂未实现此功能): - 令牌只是用于验证用户的字符串
- 一般来说,令牌会在一段时间后过期
- 过时后,用户要再次登录
- 这样一来,就算令牌被人窃取,风险也较低。因为它与永久密钥不同,在绝大多数情况下不会长期有效
- 前端临时将令牌存储在某个位置
- 用户点击前端,前往前端应用的其它部件
- 前端需要从 API 中提取更多数据:
- 为指定的端点(Endpoint)进行身份验证
- 因此,用 API 验证身份时,要发送值为
Bearer+ 令牌的请求头Authorization - 假如令牌为
foobar,Authorization请求头就是:Bearer foobar
oauth2_scheme = OAuth2PasswordBearer(tokenUrl="token")
获取当前用户
创建用户模型
from pydantic import BaseModel

class User(BaseModel):
    username: str
    email: Union[str, None] = None
    full_name: Union[str, None] = None
    disabled: Union[bool, None] = None
创建依赖项
async def get_current_user(token:str=Depends(oauth2_schema))
    user=fake_decode_token(token)
    return user
def fake_decode_token(token):
    return User(username=token+"fakedecoded",email="john@example.com")
注入当前用户
@app.get("/users/me")
async def read_users_me(current_user: User = Depends(get_current_user)):
    return current_user
装饰器本质上是一个函数,它接收另一个函数作为参数,并返回一个新的函数,目的是在不修改原函数代码的情况下,为原函数增加额外的功能。
中间件
创建中间件顶部使用@app.middleware(“http”)
@app.middleware("http")//请将以下函数定义为处理http请求的中间件
async def add_process_time_header(request: Request, call_next):
    start_time = time.perf_counter()
    response = await call_next(request)
    process_time = time.perf_counter() - start_time
    response.headers["X-Process-Time"] = str(process_time)
    return response
cors跨域资源共享
使用 CORSMiddleware
from fastapi import FastAPI
from fastapi.middleware.cors import CORSMiddleware

app = FastAPI()

origins = [
    "http://localhost.tiangolo.com",
    "https://localhost.tiangolo.com",
    "http://localhost",
    "http://localhost:8080",
]

app.add_middleware(
    CORSMiddleware,
    allow_origins=origins,
    allow_credentials=True,
    allow_methods=["*"],
    allow_headers=["*"],
)


@app.get("/")
async def main():
    return {"message": "Hello World"}
allow_credentials - 跨域请求支持cooies,默认是cookies
多文件协作
有几个__init__.py文件,这是代码能从一个文件导入到另一个文件的原因
导入APIRouter
from fastapi import APIRouter
router=APIRouter()
在main.py中导入路径
from fastapi import Depends, FastAPI

from .dependencies import get_query_token, get_token_header
from .internal import admin
from .routers import items, users

app = FastAPI(dependencies=[Depends(get_query_token)])


app.include_router(users.router)
app.include_router(items.router)
app.include_router(
    admin.router,
    prefix="/admin",
    tags=["admin"],
    dependencies=[Depends(get_token_header)],
    responses={418: {"description": "I'm a teapot"}},
)


@app.get("/")
async def root():
    return {"message": "Hello Bigger Applications!"}
后台任务
使用BackgroundTasks
@app.post("/send-notification/{email}")
async def send_notifaction(email:str,background_tasks:BackgroundTaks):
    background_tasks.add_task(write_notification,email,messages="some notification")
    return {"message": "Notification sent in the background"}
fastapi会创建一个backgroundtasks类型的对象并作为参数传入
创建一个任务函数
from fastapi import BackgroundTasks,FastAPI
app=FastAPI()
def write_notifacation(email:str,message=""):
    with open("log.txt",mode="w") as email_file:
    content = f"notifaction for {email}:{message}"
    email_file.write(content)
设置swagger ui服务于/documentation并且禁用redoc
app = FastAPI(docs_url="/documentation", redoc_url=None)
静态文件
导入staticfiles,搞在一个staticfiles()实例到一个指定路径
from fastapi import FastAPI
from fastapi.staticfile import StaticFiles
app=FastAPI()
app.mount("/static",StaticFile(directory="static"),name="static")
任何以"/static"开头的路径都会被第一个“/static“指向的子路径处理
测试
导入tetsclient
from fastapi import FastAPI
from fastapi.testclient import TestClient

app = FastAPI() //创建一个testclient


@app.get("/")
async def read_main():
    return {"msg": "Hello World"}


client = TestClient(app)


def test_read_main()://创建名字以test_开头的函数,这是标准的pytest约定
    response = client.get("/")
    assert response.status_code == 200
    assert response.json() == {"msg": "Hello World"}
写assert语句
测试文件结构
.
├── app
│   ├── __init__.py
│   ├── main.py
│   └── test_main.py
celery
创建任务Celery()
from celery import Celery
app=Celery('tasks',broker='redis://localhost:6379/0')
@app.task
def add(x,y):
    return x+y
调度任务dely()
from tasks import add
add.delay(4,4)
保留结果
app = Celery('tasks', backend='rpc://', broker='pyamqp://')
返回任务是否已完成处理(log?)
result.ready()
后端使用资源来存储和传输结果,确保资源被释放时,必须调用get()或forget()调用任务返回的每个asyncresult实例
配置
app.conf.update(
    task_serializer='json',
    accept_content=['json'],  # Ignore other content
    result_serializer='json',
    timezone='Europe/Oslo',
    enable_utc=True,
)
通过调用config_from_object()告诉celery实例使用配置模块
app.config_from_object('celeryconfig')
验证配置文件是否正常工作不包含语法错误,导入
python -m celeryconfig
项目结构
src/
    proj/__init__.py
        /celery.py
        /tasks.py
proj/celery.py
from celery import Celery

app = Celery('proj',
             broker='amqp://',
             backend='rpc://',
             include=['proj.tasks'])

# Optional configuration, see the application user guide.
app.conf.update(
    result_expires=3600,
)

if __name__ == '__main__':
    app.start()
Proj/tasks.py
from .celery import app
@app.task
def add(x, y):
    return x + y
@app.task
def mul(x, y):
    return x * y
@app.task
def xsum(numbers):
    return sum(numbers)
在后台启动一个或多个工作程序
celery multi start w1 -A proj -l INFO
chain
chain(add.s(4)|mul.s(8)).get()
另一种写法
c=chain(add.s(4)|mul.s(8))
c.get()
路由
Task_routes将所有内容集中在一个位置
app.conf.update(task_routes={'prok.tasks.add':{'queue':'hipri'}})
redis
redis insight可视化
文档数据库
支持在json和hash文档上创建二级索引
schema = (
    TextField("$.brand", as_name="brand"),
    TextField("$.model", as_name="model"),
    TextField("$.description", as_name="description"),
    NumericField("$.price", as_name="price"),
    TagField("$.condition", as_name="condition"),
)

index = r.ft("idx:bicycle")
index.create_index(
    schema,
    definition=IndexDefinition(prefix=["bicycle:"], index_type=IndexType.JSON),
)
任何带有键前缀bicycle:的预先存在的json文档会自动添加到索引中
rag不说了,应该没人会用redis搭建rag or embedding?
ASGI
scope,一个包含连接细节的dic,send是一个异步可调用对象,允许应用程序向客户端发送事件消息
events
ASGI只需要http.request和http.disconnect
对于像websocket,接受websocket.connect,发送web socket.send,接受websocket.receive,最后接受web socket.disconnect
ASGI应用程序应该是单个异步可调用对象
coroutine application(scope,receive,send)
unicorn
使用–reload使用watchfiles
运行服务器
uvicorn main:app
更好地控制配置和服务器生命周期,使用config和server
import uvicorn
if __name__ == "__main__":
    config=uvicorn.Config("main:app",port=5000,log_level="info")
    server =uvicorn.Server(config)
    server.run()
工厂函数
调用者只需要告诉工厂它想要什么,而不需要知道类的存在,也不需要知道如何去实例化它
uvicorn使用ASGI规范与应用程序交互
scope-包含传入连接的信息dic
{
    'type': 'http',
    'scheme': 'http',
    'root_path': '',
    'server': ('127.0.0.1', 8000),
    'http_version': '1.1',
    'method': 'GET',
    'path': '/',
    'headers': [
        (b'host', b'127.0.0.1:8000'),
        (b'user-agent', b'curl/7.51.0'),
        (b'accept', b'*/*')
    ]
}
Receive-接受来自服务器的传入消息的通道
Send-将传出消息发送到服务器的通道
await send({
    'type': 'http.response.start',
    'status': 200,
    'headers': [
        [b'content-type', b'text/plain'],
    ]
})
await send({
    'type': 'http.response.body',
    'body': b'Hello, world!',
})
请求和响应示例
async def app(scope, receive, send):
    """
    Echo the method and path back in an HTTP response.
    """
    assert scope['type'] == 'http'

    body = f'Received {scope["method"]} request to {scope["path"]}'
    await send({
        'type': 'http.response.start',
        'status': 200,
        'headers': [
            [b'content-type', b'text/plain'],
        ]
    }) //发送响应头
    await send({
        'type': 'http.response.body',
        'body': body.encode('utf-8'),
    }) //发送响应体
在ASGI中,一个完整的http响应是通过发送一系列的的事件完成的
接受scope,发送响应头,发送响应体
读取请求正文
async def read_body(receive):
    """
    Read and return the entire body from an incoming ASGI message.
    """
    body = b''
    more_body = True

    while more_body:
        message = await receive()
        body += message.get('body', b'')
        more_body = message.get('more_body', False)

    return body


async def app(scope, receive, send):
    """
    Echo the request body back in an HTTP response.
    """
    body = await read_body(receive)
    await send({
        'type': 'http.response.start',
        'status': 200,
        'headers': [
            (b'content-type', b'text/plain'),
            (b'content-length', str(len(body)).encode())
        ]
    })
    await send({
        'type': 'http.response.body',
        'body': body,
    })
流式响应
import asyncio


async def app(scope, receive, send):
    """
    Send a slowly streaming HTTP response back to the client.
    """
    await send({
        'type': 'http.response.start',
        'status': 200,
        'headers': [
            [b'content-type', b'text/plain'],
        ]
    })
    for chunk in [b'Hello', b', ', b'world!']:
        await send({
            'type': 'http.response.body',
            'body': chunk,
            'more_body': True
        })
        await asyncio.sleep(1)
    await send({
        'type': 'http.response.body',
        'body': b'',
    })
发送响应头
分数据块chunk,在每次发送完一块chunk后,程序会异步暂停1秒,因为是await,服务器的事件循环可以去处理其他请求,不会被阻塞
结束响应流
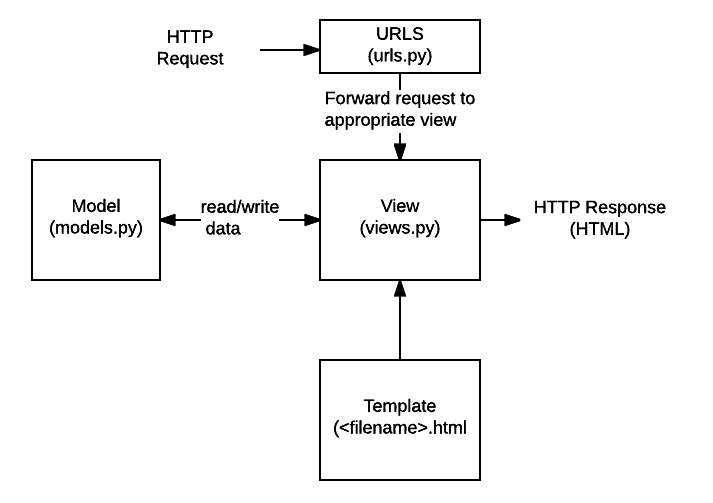
django-admin框架
- 文件夹结构
locallibrary/
    manage.py
    locallibrary/
        settings.py
        urls.py
        wsgi.py
settings包括所有的网站设置,urls定义了url到view的映射,wsgi帮助django应用和网络服务器间的通讯
创建应用
python manager startapp catalog
视图函数就是views.py,模型就是models.py,测试是tests.py,网站管理设置是admin.py,注册应用是apps.py
Migration/文件夹,当修改数据模型时,这个文件会自动升级数据库
模型根据数据库来创建
每次模型创建完成以后,要重新运行数据库迁移将它们添加到数据库中
python3 manage.py makemigrations
python3 manage.py migrate
创建超级用户
python manage.py createsuperuser
启动开发服务器
python manage.py runserver
node
一个完整的基于node.js的web应用
需要实现:
- 我们需要提供Web页面,因此需要一个HTTP服务器
- 对于不同的请求,根据请求的URL,我们的服务器需要给予不同的响应,因此我们需要一个路由,用于把请求对应到请求处理程序(request handler)
- 当请求被服务器接收并通过路由传递之后,需要可以对其进行处理,因此我们需要最终的请求处理程序
- 路由还应该能处理POST数据,并且把数据封装成更友好的格式传递给请求处理入程序,因此需要请求数据处理功能
- 我们不仅仅要处理URL对应的请求,还要把内容显示出来,这意味着我们需要一些视图逻辑供请求处理程序使用,以便将内容发送给用户的浏览器
- 最后,用户需要上传图片,所以我们需要上传处理功能来处理这方面的细节
函数回调
一个函数(A)作为参数被传递给另一个函数(B),然后在函数(B)执行的某个特定时刻,这个被传递进来的函数(A)会被调用执行。
var http = require("http");

function onRequest(request, response) {
  console.log("Request received.");
  response.writeHead(200, {"Content-Type": "text/plain"});
  response.write("Hello World");
  response.end();
}

http.createServer(onRequest).listen(8888);

console.log("Server has started.");
onRequest() 函数被触发的时候,有两个参数被传入: request 和 response 。
当收到请求时,使用 response.writeHead() 函数发送一个HTTP状态200和HTTP头的内容类型(content-type),使用 response.write() 函数在HTTP相应主体中发送文本“Hello World"。
调用 response.end() 完成响应。